Pet Basic Information
3.1.1 Pet Basic Information
1. Overview
The pet basic information page is used to manage pet data, including adding, querying, and editing pets, transferring owners, and managing pet/owner tags.
Users can use basic or advanced search functions to accurately find specific pets, and can also add or edit pet data and avatars.
In addition, users can register pets, call numbers, manage stored value, and check unsettled bills and checkout on the pet basic information page.
2. Introduction
2.1 Pet Basic Information
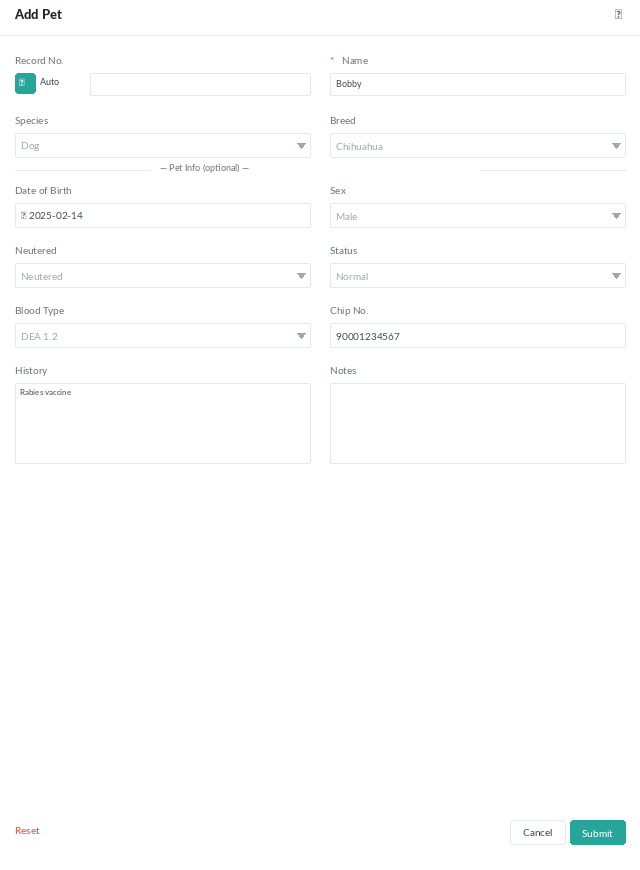
2.1.1 Add Pet
1. Click on Owner Pet
2. Click on Pet
3. Click on Add Pet
Required
- 4. Original Owner/New Owner:
- If the owner has brought other pets for consultation before, select Original Owner.
- If it’s the owner’s first visit, please select New Owner.
- 5. Owner:
- If the owner has brought other pets for consultation before, select phone number or owner name and enter search value to search for owner information.
- If it’s the owner’s first visit, please select New Owner and enter owner name and phone number (owner name is mainly for the clinic’s identification, nicknames or owner-specified names can be used, not necessarily the owner’s legal name).
- 6. Name: Please enter the pet’s name.
Optional
- Medical Record Number: The system will automatically generate a medical record number based on the medical record number rules preset in the system by the clinic. If the clinic wants to customize the medical record number, uncheck the automatic box to manually enter the medical record number.
- Species: It is recommended to select the species, so the veterinarian can use appropriate treatment methods based on the species before consultation.
- Breed: It is recommended to select the breed, so the veterinarian can use appropriate treatment methods based on the breed before consultation.
- Date of Birth/Age: Select the date of birth or enter the age, so the veterinarian can use appropriate treatment methods based on the age before consultation.
- Gender: Select gender.
- Neutered/Spayed: Select neutered/spayed status.
- Status: Select the pet’s upbringing status.
- Normal: Generally select normal for pets with owners and alive.
- Deceased: If the pet has passed away, please select this status.
- Abandoned: If the pet is not raised by the customer and the owner is unknown, please select abandoned first.
- Blood Type: If the pet’s blood type is known, please select the blood type directly to ensure the completeness of medical record data.
- Microchip Number: If the pet’s microchip number is known, please fill in the microchip number directly to ensure the completeness of medical record data.
- Medical History: If the pet’s medical history is known, please fill in the medical history directly to provide a basis for the veterinarian’s consultation.
- Remarks: If there is other supplementary information, it can be filled in this field.
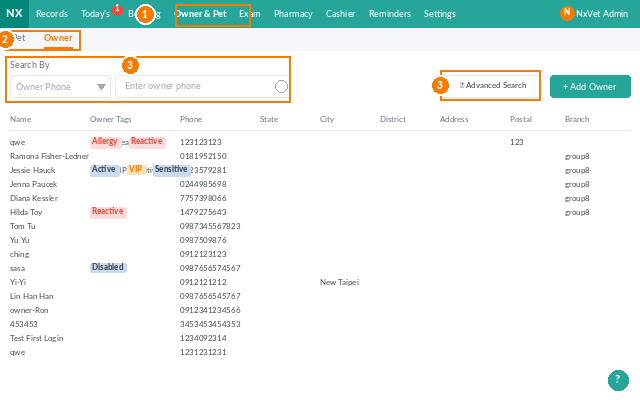
2.1.2 Query Pet Basic Information
1. Click on Owner Pet
2. Click on Pet
3. Enter keywords in the search field to search for pets. You can use Basic Search and Advanced Search to help search for pet information.
- Basic Search:
- Owner’s Pet Name
- Pet Medical Record Number
- Owner Name
- Owner Phone Number
- Advanced Search: If you can’t find owner information using basic search, you can use advanced search to enter keywords, and the system will list all owner information covering your entered keywords using fuzzy search.
- 3.1 Owner Name
- 3.2 Phone (Please enter at least 3 digits)
- 3.3 Pet Name
- 3.4 Medical Record Number
- 3.5 Species
- 3.6 Breed
- 3.7 Gender
- 3.8 Status

- 3.9 Tag
- 3.10 Microchip Number
- 3.11 Medical History
- 3.12 Remarks
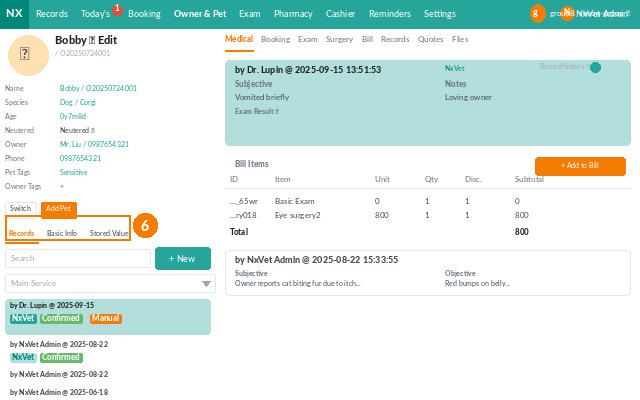
4. Click on the pet to enter the pet’s basic information page.
5. The pet’s basic information is displayed in the upper left corner, including name, medical record number, species/breed, age, neutered/spayed status, owner name & phone number, pet tags, and owner tags.
6. Click on the Basic Information tab to view detailed date of birth, gender, microchip number, medical history, remarks, and allergies.
2.1.3 Edit Pet Basic Information
1. Click on Owner Pet
2. Click on Pet
3. Enter keywords in the search field to search for pets.
4. Click on the pet to enter the pet’s basic information page.
5. Click the edit icon to enter the editing page.
Required
6. Name: Please enter the pet’s name
Optional
Medical Record Number, Species, Breed, Date of Birth/Age, Gender, Neutered/Spayed, Status (Normal/Deceased/Abandoned), Blood Type, Microchip Number, Medical History, Remarks.
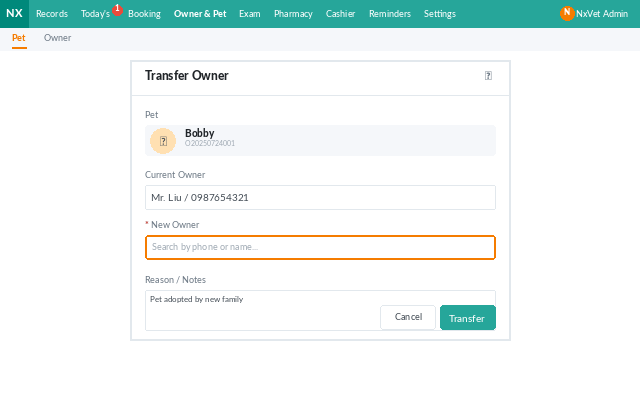
2.1.4 Transfer Owner
1. Click on Owner Pet
2. Click on Pet
3. Enter keywords in the search field to search for pets (Basic Search / Advanced Search).
4. Click on the pet to enter the pet’s basic information page.
5. Click the edit icon to enter the editing page.
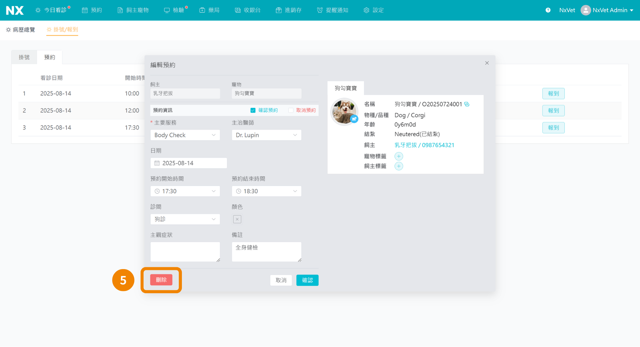
6. Click Transfer.
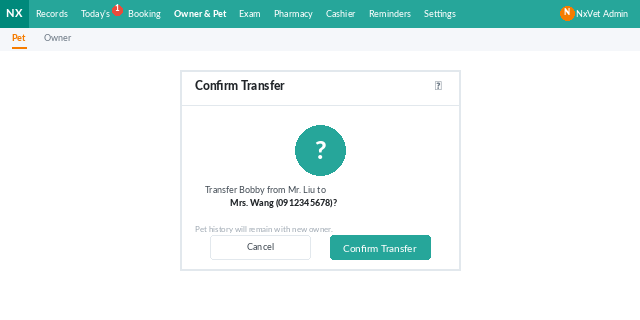
7. Enter the owner’s name or phone number to select the new owner to transfer to.
8. Click Confirm to complete the owner transfer.
2.1.5 Add/Edit Pet Avatar
1. Click on Owner Pet
2. Click on Pet
3. Enter keywords in the search field to search for pets.
4. Click on the pet to enter the pet’s basic information page.
Mobile Upload
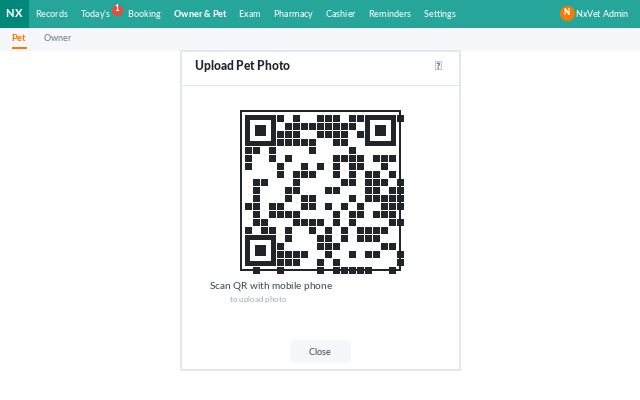
5. Click the camera icon.
6. Scan the QR code with your phone.
7. Click Select File to choose an image file from your phone’s photo library, files, Google Drive, or take a photo and upload directly.
8. Click Confirm to complete the file upload.
9. Click the refresh icon to see the uploaded avatar.
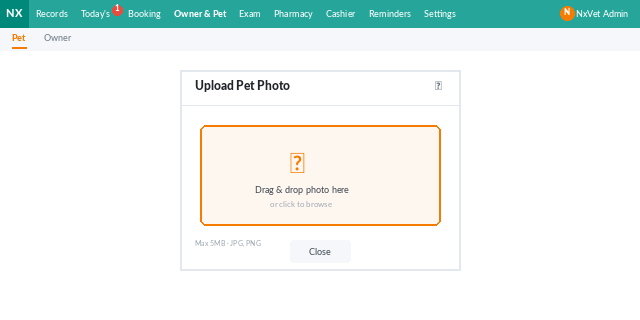
Computer Upload
a: Click on the pet avatar to select an image file from your computer. The new avatar will be displayed directly after uploading.
b: You can freely crop the size of the avatar.
2.1.6 Add Pet Tags & Owner Tags
1. Click on Owner Pet
2. Click on Pet
3. Enter keywords in the search field to search for pets.
4. Click on the pet to enter the pet’s basic information page.
5. Click the + icon to add a tag.
6. Click on Category
7. Then click on Subcategory
8. The custom tags will be displayed in the right tag column. Click on the tag to add it (multiple selections are allowed).
*Categories, subcategories, and tags are all customizable and can be edited, added, or deleted.
2.1.7 Delete Pet Tags & Owner Tags
1. Click on Owner Pet
2. Click on Pet
3. Enter keywords in the search field to search for pets.
4. Click on the pet to enter the pet’s basic information page.
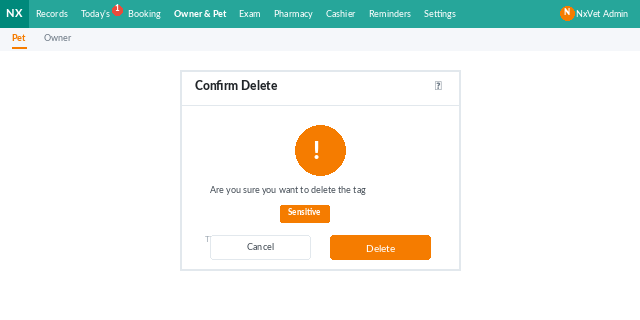
5. Click the x icon to the right of the tag to delete it.
6. Enter DELETE to complete the deletion.
2.1.8 Show/Hide Pet Tags & Owner Tags
1. Click on Owner Pet
2. Click on Pet
3. Enter keywords in the search field to search for pets.
4. Click on the pet to enter the pet’s basic information page.
5. Click the eye icon to show or hide tags.
2.1.9 Registration
1. Click on Owner Pet
2. Click on Pet
3. Enter keywords in the search field to search for pets.
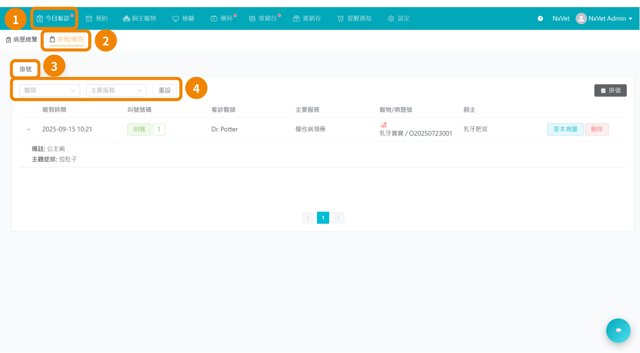
4. Click on the pet to enter the pet’s basic information page.
5. Click Register.
Required
6. Main Service: Select the main service for this registration (purpose of visit).
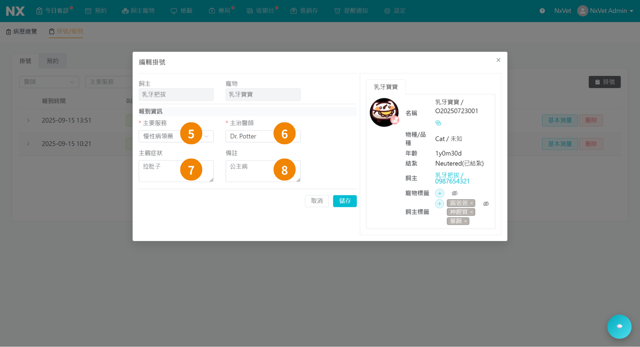
7. Attending Veterinarian: Select the attending veterinarian for the appointment.
Optional
- 8. Fill in subjective symptoms: If the owner has informed about the pet’s condition during the appointment, subjective symptoms can be entered for the veterinarian to understand the pet’s condition in advance before consultation.
- 9. Remarks: If there is other supplementary information, it can be filled in this field.
- 10. Confirm: If basic measurements have not been taken, click Confirm to complete the new registration. Basic measurements can still be added or edited in 1.2 Check-in/Registration.
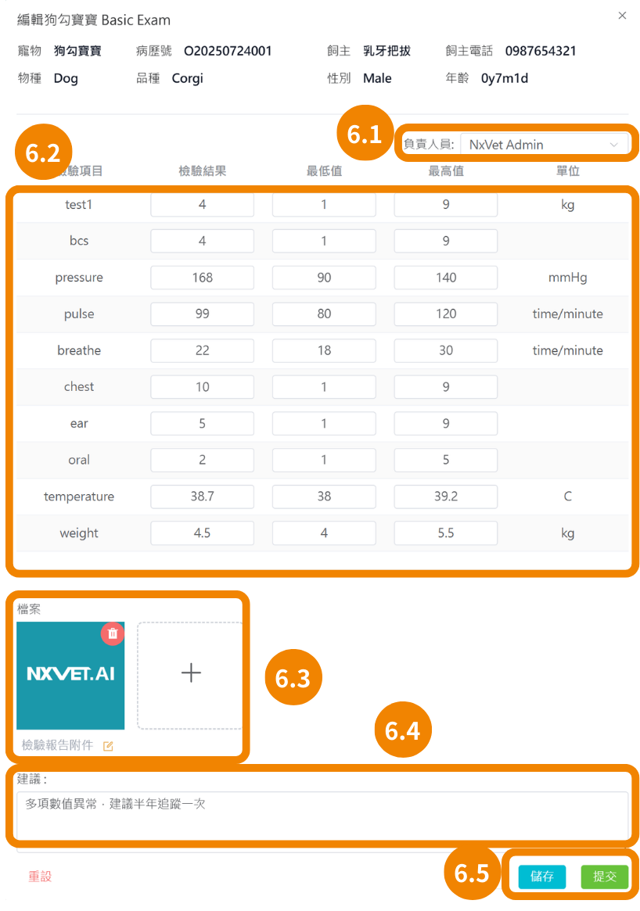
- 11. Confirm & Edit Basic Measurements: If you want to take basic measurements for the pet immediately after registration, click this button.
- 11.1 Responsible Person
- 11.2 Test Values
- 11.3 Files
- 11.4 Suggestions
- 11.5 Save/Submit
12. After completing the registration, the system will automatically generate a new medical record and import the information filled in during registration. To edit this new medical record, please refer to 3.1.2 Pet Medical Record 2.2 Edit Medical Record.
2.1.10 Call Number
1. Click on Owner Pet
2. Click on Pet
3. Enter keywords in the search field to search for pets.
4. Click on the pet to enter the pet’s basic information page.
5. Click Call Number.
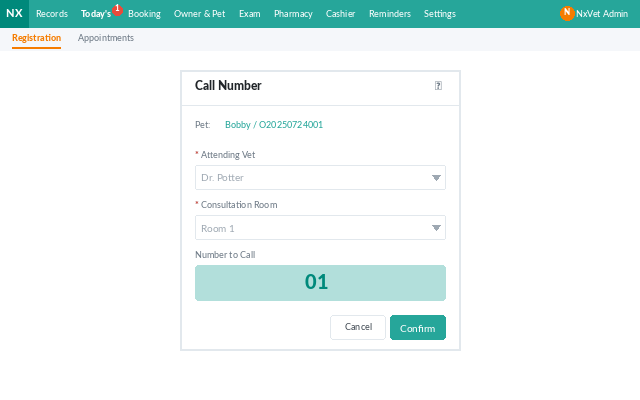
5. Select the attending veterinarian.
6. Select the consultation room.
7. Click Confirm to automatically synchronize the calling system, instantly updating the calling screen on Line@ and TV.
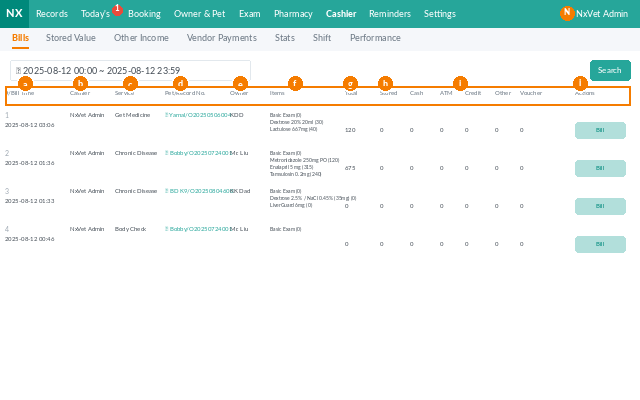
2.1.11 Query Over/Under Record & Unsettled Bills
1. Click on Owner Pet
2. Click on Pet
3. Enter keywords in the search field to search for pets.
4. Click on the pet to enter the pet’s basic information page.
5. Click the Over/Under Record tab.
6. Filter the time period you want to view.
7. This section will list a simple summary of unsettled bills. Click on the bill to check out.
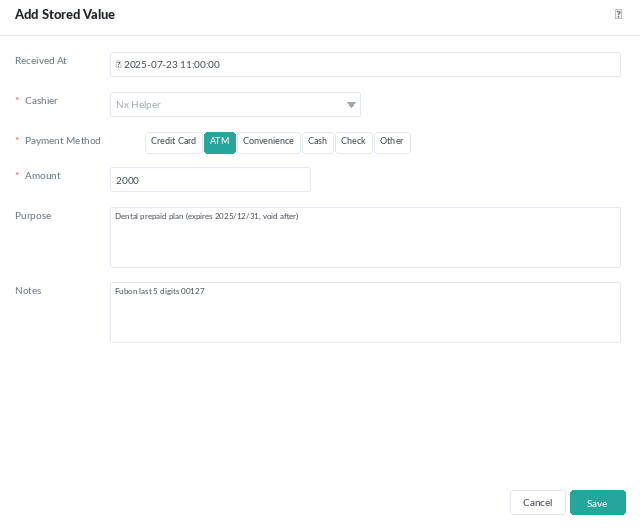
2.1.12 Add Stored Value
1. Click on Owner Pet
2. Click on Pet
3. Enter keywords in the search field to search for pets.
4. Click on the pet to enter the pet’s basic information page.

5. Click the Over/Under Record tab.
6. Click the + Stored Value button to add a new amount.
Required
- Recipient: Select the staff member who is currently performing the collection operation.
- Payment Method: Select the owner’s payment method (Credit Card, ATM, Convenience Store, Cash, Check, Other).
- Payment Amount: Enter the amount to be stored this time.
Optional
- Collection Time: It is recommended to fill in the accurate collection time as much as possible, which helps to clarify and facilitate cash counting.
- Purpose: The owner’s stored value can be used for various expenses within the clinic.
- Remarks: If there is other supplementary information, such as credit card or the last five digits of the transfer for easy reconciliation.
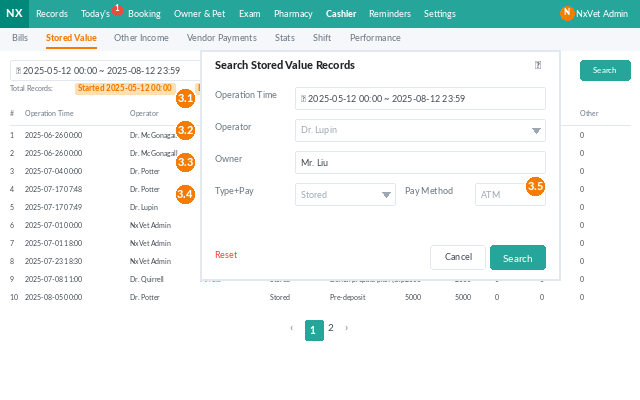
2.1.13 Query Stored Value Record
1. Click on Owner Pet
2. Click on Pet
3. Enter keywords in the search field to search for pets.
4. Click on the pet to enter the pet’s basic information page.
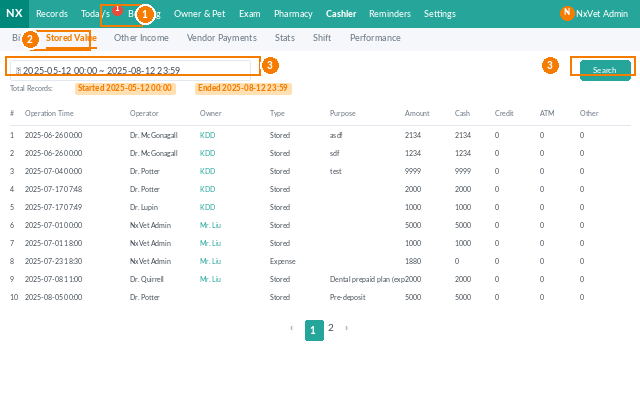
5. Click the Over/Under Record tab.
6. Stored Value: This column will list the owner’s current remaining stored value. Click on the blue stored value amount to view each top-up record.
7. The list will display each top-up record, including collection time, recipient, amount, and payment method.
2.1.14 Checkout/Collection
1. Click on Owner Pet
2. Click on Pet
3. Enter keywords in the search field to search for pets.
4. Click on the pet to enter the pet’s basic information page.
5. Click the Over/Under Record tab.
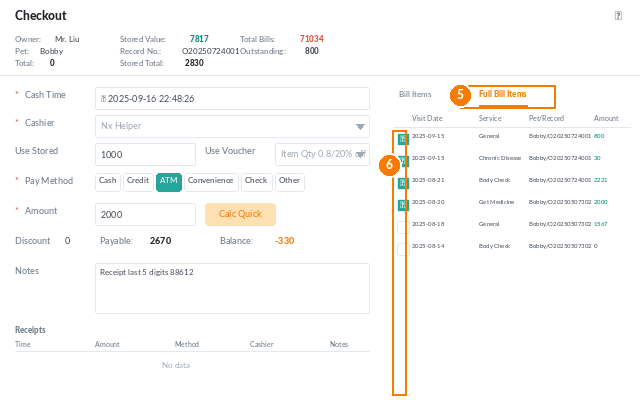
6. Filter the time period you want to view.
7. This section will list a simple summary of unsettled bills. Click on the bill to check out.